
Emergencies do not wait for a convenient time. They do not announce themselves. They happen at ten at night when the nearest clinic is forty minutes away, or on a Sunday morning when your dog has a deep laceration, and you have nothing to manage it with.
A dog medical kit does not replace veterinary care. This is the most important thing to understand before reading further. It is a stabilisation tool, not a treatment tool. Its purpose is to keep the dog’s condition from deteriorating in the critical window between when an emergency occurs and when professional care is reached. That window is when a well-stocked, properly maintained kit saves lives.
Every dog owner needs one. Not because emergencies are constant, but because the one time you need it, you will have minutes to act, not hours.
Why Every Dog Owner Needs a Medical Kit
The practical reality of dog ownership is that injuries, toxic exposures, and acute medical events are not rare edge cases. They are a predictable category of experience that comes with sharing your life with a dog. Cuts and lacerations from debris, fights, or sharp objects. Insect stings producing allergic reactions. Ingestion of toxic plants or household substances. Heatstroke in summer. Limb injuries from falls or accidents.
In every one of these situations, the difference between a good outcome and a serious one is partly determined by what happens in the first fifteen to thirty minutes. Clean wound management prevents infection that would otherwise require surgery. Controlled bleeding buys the time needed to reach emergency care. Knowing the dog’s temperature tells you whether you are dealing with fever or heatstroke.
A medical kit makes these first-response actions possible. The absence of one makes them impossible.
Emergencies Where a Medical Kit Becomes Critical
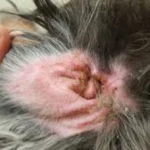
The situations that most commonly require immediate first aid intervention include visible wound and bleeding from any cause requiring pressure and coverage, suspected toxic ingestion requiring identification and transport to a clinic, seizures requiring a safe environment and monitoring, breathing difficulty requiring airway assessment and urgent transport, severe vomiting or diarrhoea with signs of dehydration, bee stings or insect exposure producing allergic responses, eye injuries requiring irrigation, and overheating requiring cooling intervention.
In each of these scenarios, the first five to ten minutes are the ones where you are managing alone. A kit that contains the right items, and an owner who knows what each item is for, converts those minutes from panic into controlled action.
Complete Dog Medical Kit Checklist
| Category | Items | Purpose |
|---|---|---|
| Wound care and bandaging | Sterile gauze pads, self-adhesive bandage wrap (Vetrap), medical tape, non-stick wound dressings | Control bleeding, cover wounds, secure bandages without adhering to fur |
| Cleaning and antiseptics | Sterile saline solution, chlorhexidine solution, individually wrapped antiseptic wipes | Clean wounds of debris and bacteria before covering |
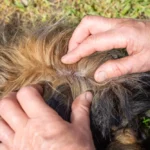
| Tools | Blunt-nosed scissors, tweezers or tick remover, digital rectal thermometer, 5ml syringe without needle | Cut bandages safely, remove ticks or debris, measure temperature, flush wounds or administer liquid |
| Protection and handling | Non-latex examination gloves, soft muzzle or bandage material for improvised muzzle, large towel | Protect handler from bite risk in a dog in pain, restrain safely during treatment |
| Emergency essentials | Veterinary clinic phone number, nearest emergency clinic address, VOSD emergency contact, written medical history including known allergies and medications | Cannot be improvised at the moment of emergency |
| Medications (vet-guided only) | Antihistamine tablet as directed by your veterinarian, glucose paste or powder for hypoglycaemia, veterinary-prescribed probiotic | Only administer under veterinary guidance, never use human medications without specific veterinary instruction |
| Situational additions | Cold pack, eye wash solution, styptic powder for nail injuries, emergency thermal blanket | Cooling for heatstroke, eye irrigation, nail quick bleeding, hypothermia prevention |
Related Products


Related Videos


What You Can Check at Home and What You Cannot
Certain basic assessments are within the scope of a prepared dog owner and provide information that is clinically relevant when reporting to a veterinarian.
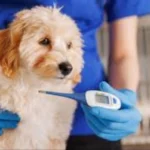
Temperature measurement using a digital rectal thermometer establishes whether fever is present. Normal canine temperature is 38.3 to 39.2 degrees Celsius. Anything above 39.4 degrees warrants veterinary assessment. Above 40 degrees is an emergency.
Hydration assessment using the skin tent test, gently lifting the skin over the neck and observing whether it returns to position immediately, provides a basic indicator of dehydration. Mucous membrane colour assessment, checking whether gum colour is pink and moist or pale, white, grey, or tacky, provides immediate information about circulatory status.
Respiratory rate counting over fifteen seconds and multiplying by four gives a resting respiratory rate that, if significantly elevated in a resting dog, indicates distress.
What you cannot assess at home: the depth and internal extent of a wound, internal bleeding, organ involvement, fracture assessment, the toxicity profile of a specific ingested substance, and the cardiac and neurological status of a dog in shock. These require veterinary examination and, where indicated, imaging and blood tests.
The medical kit enables the assessments you can make. The veterinarian handles everything it cannot.
How to Use Your Dog Medical Kit: Practical Application
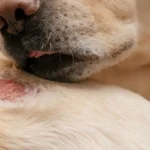
For Bleeding Wounds
Put on gloves. Apply a sterile gauze pad directly to the wound with firm pressure. Do not remove the pad to check. Maintain pressure for a minimum of five to ten minutes. If the pad soaks through, apply additional gauze over the top without removing the first layer. Once bleeding is controlled or slowing, secure with a self-adhesive bandage wrap. Transport to a veterinarian for assessment of wound depth and whether suturing is required.
For Eye Injuries or Exposure
Flush the eye gently with sterile saline or the purpose-made eye wash solution, allowing the liquid to flow across the eye surface from the inner corner outward. Do not touch the eye surface. Do not apply any ointment or medication. Prevent the dog from rubbing the eye and transport to a veterinarian.
For Suspected Heatstroke
Move the dog immediately to a cool environment. Apply room-temperature, not ice-cold, water to the body, particularly the neck, armpits, and groin. Do not cover with a wet towel, as this traps heat. Apply the cold pack wrapped in cloth to the groin area. Monitor temperature. Begin transport to a veterinarian immediately, continuing the cooling process in the vehicle.
For Suspected Toxic Ingestion
Do not induce vomiting unless specifically instructed by a veterinarian or poison control line. Do not give milk, oil, or any home remedy. Identify and bring the substance, the packaging, or a photograph of it to the clinic. The timing of ingestion and the estimated quantity are critical pieces of information for treatment decisions.
What NOT to Keep or Do
Do not keep human pain medications, including ibuprofen, paracetamol, or aspirin, in or near the dog medical kit. These are toxic to dogs, and their accidental administration causes serious harm. Even antihistamines suitable for dogs at veterinary-directed doses are not appropriate to administer without veterinary guidance for the specific situation.
Do not use Dettol, hydrogen peroxide, or alcohol-based antiseptics directly on wounds. These damage the tissue needed for healing and delay wound closure. Chlorhexidine solution diluted appropriately or sterile saline is appropriate for wound cleaning.
Do not use the medical kit as a substitute for veterinary assessment. A wound that has been bandaged, a dog that has been given an antihistamine, or a dog that has stopped vomiting still requires professional evaluation. The kit stabilises. The veterinarian diagnoses and treats.
Do not keep expired items in the kit. Check and replace items every six months. Sterile items lose their sterility once packaging is damaged or expired.
Home Kit Versus Travel Kit
Your home kit can be comprehensive. It lives in a fixed location, is accessible at any time, and can contain the full range of items described above. Store it in a clearly labelled, waterproof container in a consistent location that every adult in the household knows.
A travel kit is a reduced, portable version for car trips, hikes, or any situation where the dog is away from home. It should contain the essentials for bleeding control, wound cleaning, and basic assessment: gloves, gauze, bandage wrap, saline, scissors, a thermometer, and the emergency contact numbers. Keep it in a small zippered bag in the car at all times.
The items that distinguish a travel kit from a home kit are weight and volume. Every item in the travel kit earns its place by addressing the most likely scenarios in an outdoor or transit environment.
Prevention and Maintenance
A medical kit serves two purposes. The obvious one is emergency response. The less obvious one is preparedness-as-mindset, where the act of assembling and maintaining the kit reflects the same orientation toward your dog’s welfare that prevents many emergencies from occurring in the first place.
Check the kit every six months. Replace expired items, restock items that have been used, and update the emergency contact numbers if they have changed. Verify that medications remain within their use-by date and that sterile packaging is intact.
Keep the vet’s contact number in your phone as well as written in the kit. In an emergency, a phone screen is the first thing you reach for. A written copy in the kit is what you have when the battery is dead.